Integration Example
Getting Started with Portal Pay
Integrating Portal Pay into your store is a straightforward process. Let's walk through a detailed example.
Step 1: Setting Up a Payment
When a customer is ready to make a purchase, your store will create a payment request through our API. Here's what you need to know:
- Use theCreate a Payment API: This is where the magic happens.
- Include Redirect Information: Use
redirect_metato tell us where to send customers after their payment attempt. This ensures a smooth user experience. - Keep It Secure: This API call requires a secret key. Always make this call server-to-server to keep your secret key safe.
Secret Key:Reiterating again that this endpoint requires a secret key and we advise a server-to-server call to create a payment to avoid exposure in the browser.
Here's a simple example in Python:
import requests

url = "https://api.portal-pay.xyz/payments"

payload = {
    "redirect_meta": {
        "success_url": "https://your-store.com/thank-you",
        "cancel_url": "https://your-store.com/cart",
        "failure_url": "https://your-store.com/payment-issue"
    },
    "amount": 100,
    "description": "Stylish T-shirt",
    "customer_identifier": "customer123",
    "order_identifier": "order456",
    "currency_id": 840,  # USD
    "line_items": [
        {
            "quantity": 1,
            "title": "Cool T-shirt",
            "price": 100,
            "image": "https://your-store.com/images/cool-tshirt.jpg"
        }
    ]
}
headers = {
    "accept": "application/json",
    "content-type": "application/json",
    "authorization": "Bearer your-secret-key-here"
}

response = requests.post(url, json=payload, headers=headers)

print(response.text)
import requests
url = "https://api.portal-pay.xyz/payments"
payload = {
"redirect_meta": {
"success_url": "https://my-website/success",
"cancel_url": "https://my-website/cancel",
"failure_url": "https://my-website/failure"
},
"amount": 100,
"description": "This is a test payment",
"customer_identifier": "customer1",
"order_identifier": "order1",
"currency_id": 840,
"line_items": [
{
"quantity": 1,
"title": "t-shirt",
"price": 100,
"image": "https://nice-picture-of-tshirt.com"
}
]
}
headers = {
"accept": "application/json",
"content-type": "application/json",
"authorization": "Bearer sk-e805c350-b7f2-44a0-87b9-thisisgibberish"
}
response = requests.post(url, json=payload, headers=headers)
print(response.text)package main
import (
"fmt"
"strings"
"net/http"
"io"
)
func main() {
url := "https://api.portal-pay.xyz/payments"
payload := strings.NewReader("{\"redirect_meta\":{\"success_url\":\"https://my-website/success\",\"cancel_url\":\"https://my-website/cancel\",\"failure_url\":\"https://my-website/failure\"},\"amount\":100,\"description\":\"This is a test payment\",\"customer_identifier\":\"customer1\",\"order_identifier\":\"order1\",\"currency_id\":840,\"line_items\":[{\"quantity\":1,\"title\":\"t-shirt\",\"price\":100,\"image\":\"https://nice-picture-of-tshirt.com\"}]}")
req, _ := http.NewRequest("POST", url, payload)
req.Header.Add("accept", "application/json")
req.Header.Add("content-type", "application/json")
req.Header.Add("authorization", "Bearer sk-e805c350-b7f2-44a0-87b9-thisisgibberish")
res, _ := http.DefaultClient.Do(req)
defer res.Body.Close()
body, _ := io.ReadAll(res.Body)
fmt.Println(string(body))
}Step 2: Understanding the Response
After creating a payment, you'll receive a response like this:
{
  "id": "pay_7e5d722e-ad43-47d4-8f69-bedbb44d5545",
  "currency_id": 840,
  "currency": "USD",
  "amount": 100,
  "description": "Stylish T-shirt",
  "customer_identifier": "customer123",
  "order_identifier": "order456",
  "organization_id": "org_4769afdd-a5d3-4d15-8fb3-5849c6860484",
  "status": "created",
  "redirect_meta": {
    "success_url": "https://your-store.com/thank-you",
    "cancel_url": "https://your-store.com/cart",
    "failure_url": "https://your-store.com/payment-issue"
  },
  "line_items": [
    {
      "title": "Cool T-shirt",
      "quantity": 1,
      "price": 100,
      "image": "https://your-store.com/images/cool-tshirt.jpg"
    }
  ],
  "payment_url": "https://checkout.portalgaming.com/pay?paymentId=pay_7e5d722e-ad43-47d4-8f69-bedbb44d5545",
  "created_at": "2024-02-07T09:06:01.380866Z",
  "updated_at": "2024-02-07T09:06:01.380866Z"
}
The key piece here is the payment_url. This is where you'll send your customer to complete their payment.
Step 3: Redirect Your Customer
Simply direct your customer to the payment_url provided in the response. Our hosted payment page will take care of the rest, ensuring a secure and smooth payment process.
"payment_url": "https://checkout.portalgaming.com/pay?paymentId=pay_7e5d722e-ad43-47d4-8f69-bedbb44d5545"
Step 4: Stay Updated with Webhooks
Want real-time updates about payment statuses? Set up webhooks. To receive webhooks with details about the payment, add the URL where the notifications need to be sent by calling Create a WebhookEndpoint.
- Create a WebhookEndpoint using our API.
- We'll send payment details to the URL you provide.
- We use Svix for reliable webhook delivery. Check out our "How to verify webhooks" guide to ensure you're processing these securely.
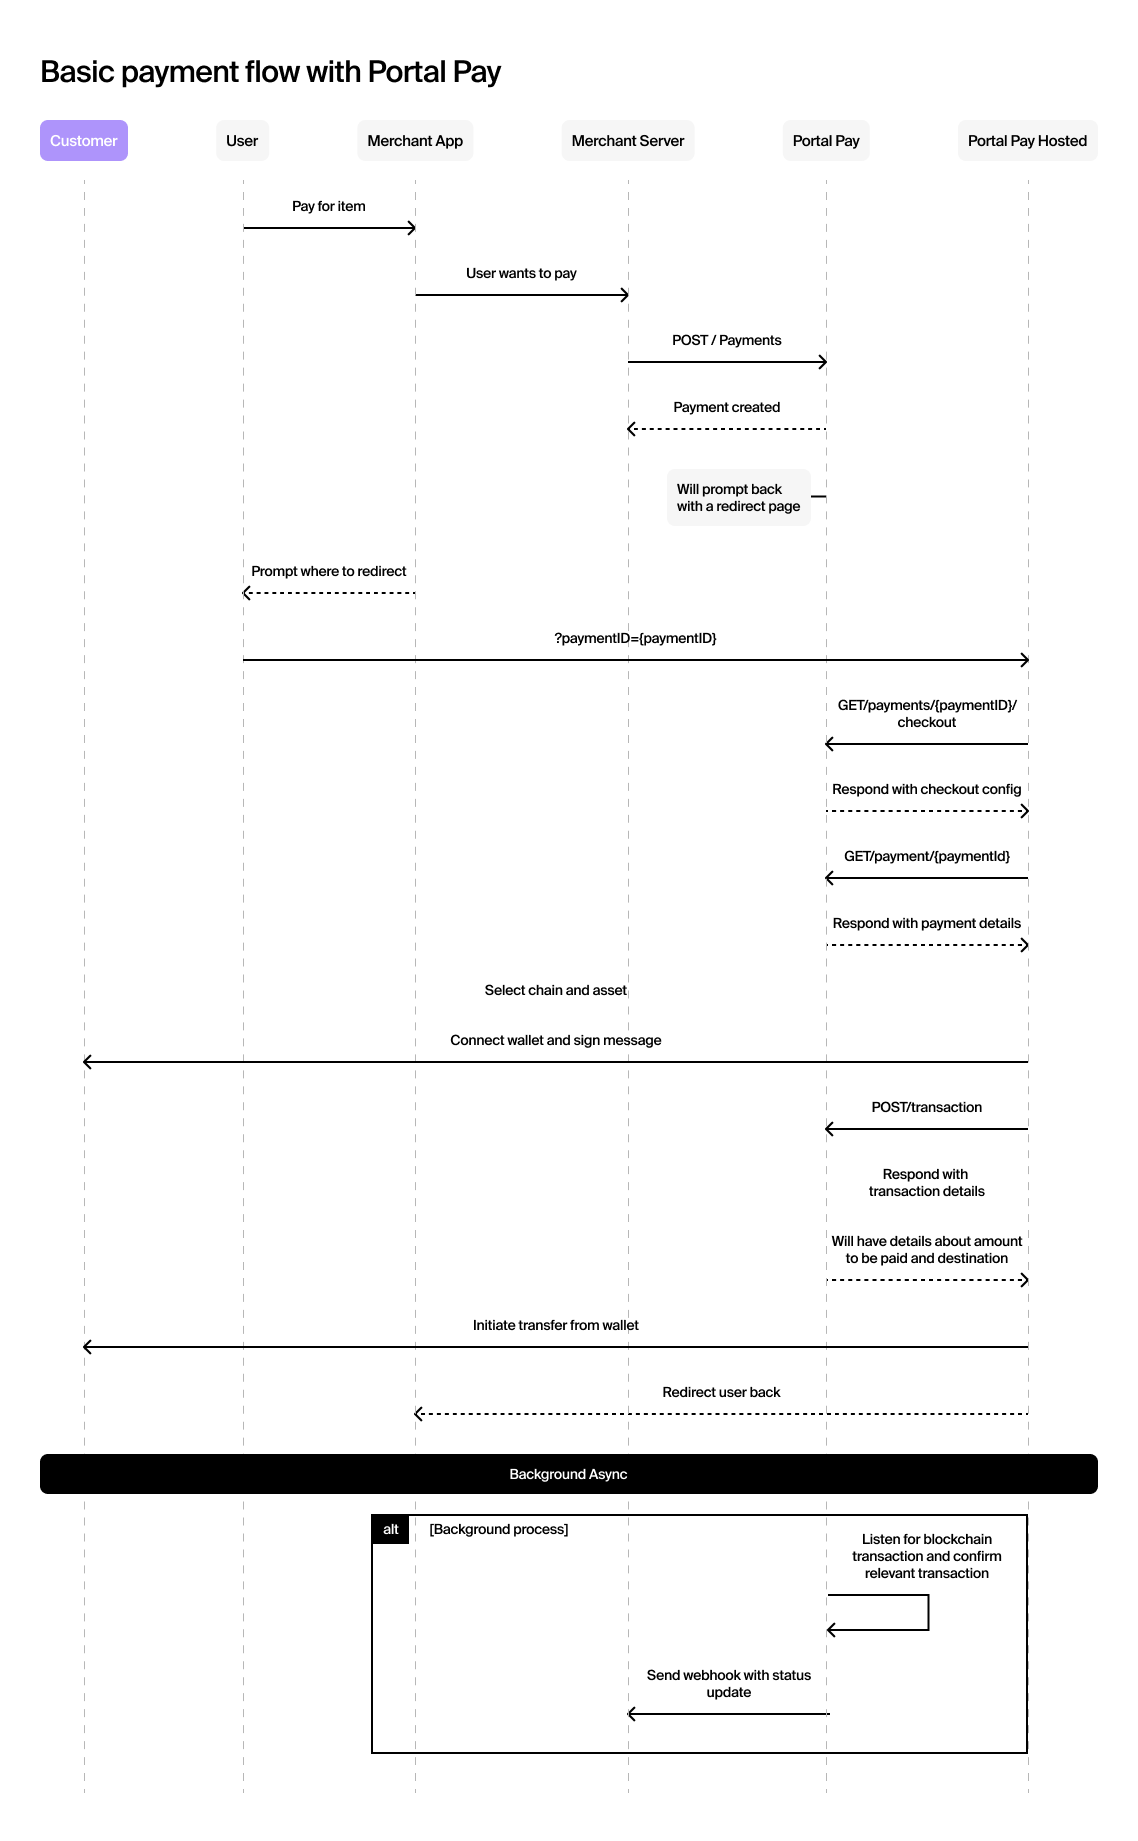
The Big Picture: Payment Sequence
This diagram shows the journey from payment creation to completion, including all possible outcomes.
By following these steps, you'll have Portal Pay integrated into your store, offering your customers a seamless and secure payment experience.
Updated about 1 year ago